I have been having fun with Easter projects this year.
Holiday Wreath:
First up is my revamp of my Easter wreath. It is basically the same, all I did was put the blue ribbon on as well. I thought it brightened it up and made it a bit more fun.
Bunny Finger Puppets:
Second project is my favorite. I was looking through my old Cross Stitcher Magazines for a good Easter project. I saw these and knew that they would be perfect! I made a set for my niece Anna (the pink ones), and nephew David (the blue ones). I let them play with them a few weeks ago and decided it would be a good little project to leave at my Moms house for the kids to play with when they are there.
I made a third set of bunnies for my nephew Magnus as well. I will be giving these to him tomorrow.
Now the coolest part about this project is I sent a picture to Cross Stitcher Magazine and they published it! I was so excited when I was looking through the latest issue and saw them! It was awesome.
Easter Ornament:
Third project was for a swap. We were assigned to make an Easter Ornament. I saw one of my friends on Facebook do this technique and I knew that I needed to try it. The pattern came out of an issue of Cross Stitcher Magazine (I'm not sure what issue, or I would say). I also love the trim that I found at Joann's one day.
I kept thinking of all these other projects that I wanted to do, but I never did. So next year I will have more.
Saturday, March 30, 2013
Sunday, March 24, 2013
Charity Squares
I saw this group on Facebook and decided to join. It's a group that is going to be making quilts for all the families that are victims of the Sandy Hook Elementary shooting. I signed up to stitch a couple of squares, and I think they turned out super cute. I got the designs from Joan Elliot's Cross Stitch Sentiments and Sayings.
Sunday, March 3, 2013
More Swapping
I thought I would post some pictures of some Swaps I have done over the past few months.
April 2012 - Humbug
May 2012 - Pendibulle
July 2012 - Christmas Ornament
Replacements
Sometimes when people don't receive the items from their assigned partners, angel stitchers are assigned. I really like the way both of these turned out.
April 2012 - Humbug
| Humbug I stitched |
| I was spoiled and received this cute card along with 2 Humbugs! |
May 2012 - Pendibulle
| Pendibulle I stitched |
July 2012 - Christmas Ornament
| Ornament I stitched |
| Kitty ornament I received along with a bunch of other goodies |
Sometimes when people don't receive the items from their assigned partners, angel stitchers are assigned. I really like the way both of these turned out.
Friday, March 1, 2013
St. Patty's Wreath Take 2
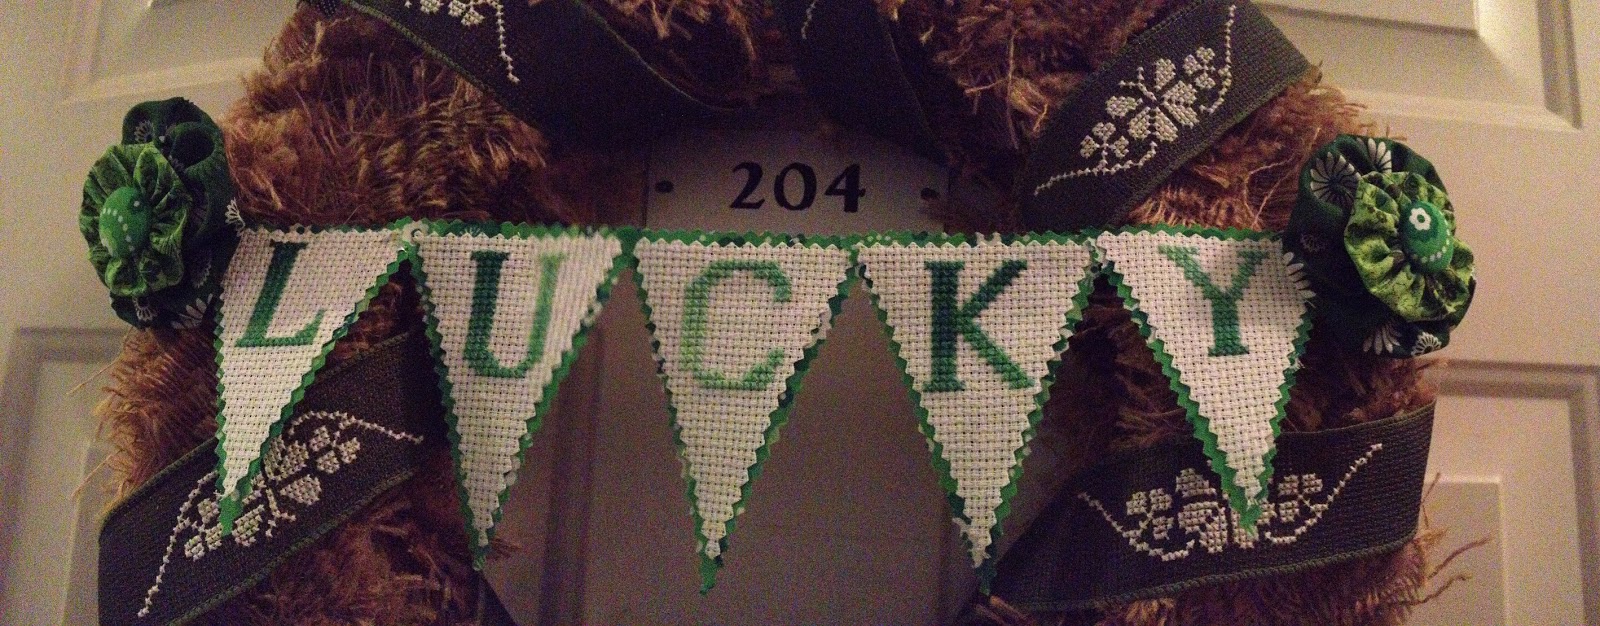
I was not a fan of last years St. Patrick's wreath, so I decided to try again this year with something different. I'm really liking the result this year, I think this one is a keeper.
I started by getting onto Google and searching images of St. Patrick's wreaths for inspiration. This was my concept drawing when I started.
First I started with making the bunting. I still had green material from last years project, so I just used that instead of going and finding something else. To cut the bunting triangles I used the best crafting purchase ever, pinking shears! I love these things.
I then traced the triangle shape onto my aida, and stitched the letters with variegated green floss that I have had for ages. I have TONS of variegated floss, I don't think I'll ever be able to use it all.
Next I made the cute little flowers. I love making these, they are so fast and easy! The middle of the flowers are self cover buttons.
I have been trying to use this ribbon that I bought for ages, but I never can figure out what to use it on. This turned out to be the perfect project. The ribbon is woven like aida, I was so excited when I fist found it around Christmas time. Whenever I see it at the store I always buy some. I'll let you imagine how much I actually have...its a lot... So anyways, I was so excited that I got to use it. I stitched little shamrocks on the portion of the ribbon that would actually be showing.
The finished product went up on my door tonight and I am so thrilled with the way it turned out!
I started by getting onto Google and searching images of St. Patrick's wreaths for inspiration. This was my concept drawing when I started.
First I started with making the bunting. I still had green material from last years project, so I just used that instead of going and finding something else. To cut the bunting triangles I used the best crafting purchase ever, pinking shears! I love these things.
I then traced the triangle shape onto my aida, and stitched the letters with variegated green floss that I have had for ages. I have TONS of variegated floss, I don't think I'll ever be able to use it all.
Next I made the cute little flowers. I love making these, they are so fast and easy! The middle of the flowers are self cover buttons.
The finished product went up on my door tonight and I am so thrilled with the way it turned out!
Saturday, February 23, 2013
Baby Baby!
There has been lots of babies being born lately...and I love it! I love making things for babies. First there was my best friend Monica. She had a baby girl, and she is the cutest little thing ever. I had a hard time deciding on what to stitch. I couldn't find anything that I really liked. So I decided to design something myself. I found this great book at the library, and it helped me make up a pattern.If you are into designing you our patterns I highly recommend this book. There are a lot of little patterns I would never use, but there are some great pages that are extremely cute and helpful. It also has a lot of great pages with alphabets that have come in handy on multiple projects. Then my sister-in-law had her baby, and I just adore Jonny. I found a pattern that I liked, and I swore I bought it. After like a month I never got anything in the mail, and after some investigating I realized I didn't buy it. By this time, time was running out, I needed to start this project pronto! The baby was already born and I needed to get it done. I decided since Fiona's turned out so well, I should design Jonny's. Side note, I had actually already designed something months before, but I just couldn't get myself to stitch it, it didn't seem right. I designed something similar to the one I was going to buy but not as big and little more simple so that I could get it stitched up quickly. I think it turned out really cute.
Wednesday, February 13, 2013
Happy Chinese New Year!!
This is the first year I have done any Chinese New Year decorations. I have always wanted to, but never knew what to do. So, I decided to to start with just the wreath and go from there. I had a lot of fun stitching up all the little Chinese Zodiac designs that I found in an issue of CrossStitcher Magazine. It was an issue from a couple of years ago so I had to go searching for it, luckily it didn't take me too long to find.
I usually love the way my wreaths turn out, but I have to be honest, this is not my favorite one. I think there were just so many things to put on it I didn't have much options. And then I was going to add some other things to it, but I've been stressed and tired and I never got around to it. And then all of a sudden it was the first day of the New Year, so I hurried and put the wreath out. So next year It will probably look different.
However, since the wedding season is pretty slow right now, and I have been having some Saturdays off, I decided to make some lanterns! I got two really awesome lanterns from Justin's brother that lives in China. I was so excited to put those up. So I wanted to make some more to go with it. They are really cute an simple. A little time consuming though. I spent most of the day putting these together.
I love the way it all turned out in the end. It goes well with my Chinese scrolls, tapestry and drum, and all my other Chinese stuff. (yes I love oriental decorations) So I'm trying to decide how long I can get away with keeping these up after the Chinese New Year is actually over.
| Rabbit, Ox and Tiger |
| Dog, Rooster and Pig |
| Horse, Ram, and Rat (I'm a rat) |
| Tiger, Snake and Monkey |
However, since the wedding season is pretty slow right now, and I have been having some Saturdays off, I decided to make some lanterns! I got two really awesome lanterns from Justin's brother that lives in China. I was so excited to put those up. So I wanted to make some more to go with it. They are really cute an simple. A little time consuming though. I spent most of the day putting these together.
| luckily I had a bunch of oriental card stock on hand. They were big 12X12 sheets so I cut them in half, and then cut those halves into 1/2 inch strips |
| Each lantern has 14 strips of paper. |
| I then strung them all together with a piece of ribbon, and with the help of my husband I got them all hung up. I used those awesome removable wall hooks. |
Friday, January 11, 2013
Nightmare Before Christmas Advent Calender
This was my "hush hush" project that I did over the holidays. I work with my cousin Landon and his favorite movie is Nightmare Before Christmas. It was pure torture not being able to share my progress on Facebook because I didn't want him or any of his siblings to see it before it was done. So now that Christmas is over I can finally blog about it!
I had been mulling around this idea in my head pretty much the whole year! I didn't know how I was going to do it, and I changed my mind about a thousand times on what I was going to do, but finally at crunch time I had to decide and it all just fell together so nicely. There was one night where I was just stumped and had no clue what to do, so I sat down and watched the movie to get inspired. I'm glad that I did. I didn't use any of the ideas that I originally thought of, go figure.
Some of the details that I love about this project.
So in the end I think it turned out great! It was a really fun project with a lot of learning and improvising. But that is what I love about crafting! I can always learn something new!
I had been mulling around this idea in my head pretty much the whole year! I didn't know how I was going to do it, and I changed my mind about a thousand times on what I was going to do, but finally at crunch time I had to decide and it all just fell together so nicely. There was one night where I was just stumped and had no clue what to do, so I sat down and watched the movie to get inspired. I'm glad that I did. I didn't use any of the ideas that I originally thought of, go figure.
Some of the details that I love about this project.
- The spider web material over Christmas tree material.
- This stuff was a bugger to find! I was dumb and procrastinated, and it was the day after Halloween and I panicked! If I was going to go forward I needed this fabric fast! I drove out to a Joann's about a half hour away from my house, and looked EVERYWHERE for fabric like this. This was not what I was originally looking for, but i found this,and just in time too because right after I nabbed it some lady gave me a guilt trip and wanted it. But I stood my ground, and got it.
- Felt ornaments
- I love felt! If you read my blog you know that. So I made all the ornaments out of felt, some sparkly felt some not. There is a little pocket in the back of each one for a piece of candy. That is one thing I should of planned better. It was kind of hard to find candy that fit after I was done. Luckily I did find something, but they just barely fit.
- All the ornaments hook onto the ribbon with tiny close pins that I covered with white sparkly felt and a cute little glittery sticker thing that I happened to run across one night at Michael's.
- The wooden numbers were a find! I was going to stitch the numbers on but that would of taken a ton of time, and I was already hand stitching all the ornaments together. So I found these wooden numbers online. It was probably the most expensive part of the project but I think it made it look "finished" for lack of a better word. The only problem with them was they were actually brown. So I was going to spray paint them, but its cold outside and I can be really lazy. So I ended up just using a black marker and coloring all the numbers.
- The Black Frame
- I actually have had this frame for years. Its been sitting in my closet since I was married. Originally I was going to make it all fabric so you could roll it up during the non-Christmas season. But, I'm not that great with a sewing machine yet and that would of been pretty ambitious to try. So randomly this idea popped into my head. So the cardboard that comes in the frame is what I upholstered with the Christmas tree and Spider web material, and attached everything to that.
- Once again I had the problem of a wrong color, the frame was originally a reddish wood color. My mom is craft central, so she loaned me some black paint and I painted it one night, she even had gloss to spray on it so it made it look better. Thanks Mom!!
- The Picture in the Middle
- This was my big headache! I originally bought an iron-on transfer that I found on ebay. Well it came and I totally screwed it up! And I didn't have time to get another one. So my husband was like, "just print a picture." Well....ok. So I found a picture on line and luckily I do have a pretty nice printer, and it printed up really good, and I just attached it on. I think it could of been better, but I just didn't have the time.
So in the end I think it turned out great! It was a really fun project with a lot of learning and improvising. But that is what I love about crafting! I can always learn something new!
Subscribe to:
Posts (Atom)